 $path1 = 'HKLM:\SOFTWARE\Microsoft\.NETFramework\v2.0.50727'
 $path2 = 'HKLM:\SOFTWARE\Microsoft\.NETFramework\v4.0.30319'

#New-item -Path $path1 #Uncomment this line if you need to add the folder
 New-ItemProperty -Path $path1 -Name 'SystemDefaultTlsVersions' -Value 1 -PropertyType DWord
 New-ItemProperty -Path $path1 -Name 'SchUseStrongCrypto' -Value 1 -PropertyType DWord

#New-item -Path $path2 #Uncomment this line if you need to add the folder
 New-ItemProperty -Path $path2 -Name 'SystemDefaultTlsVersions' -Value 1 -PropertyType DWord
 New-ItemProperty -Path $path2 -Name 'SchUseStrongCrypto' -Value 1 -PropertyType DWord
SQL Server 2019 RTM is shipped with TLS 1.2 support and no additional update/fix should be required to enable TLS 1.2 support. The server where SQL is installed must support TLS 1.2. Microsoft SQL 2019 /2016 is already enabled for TLS 1.2.
To ensure server can operate over TLS. Follow the below instructions to configure SQL server 2016.
Enable TLS 1.2 to the registry if needed
Start the registry editor by clicking on Start and Run. Type in “regedit” into the Run – Note: You will be editing the registry.
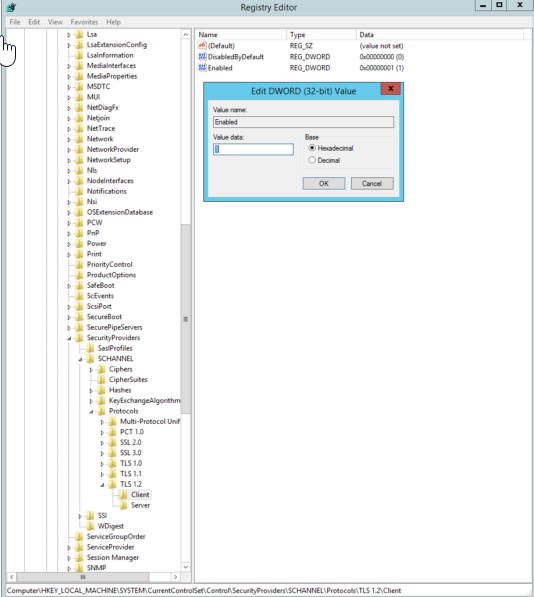
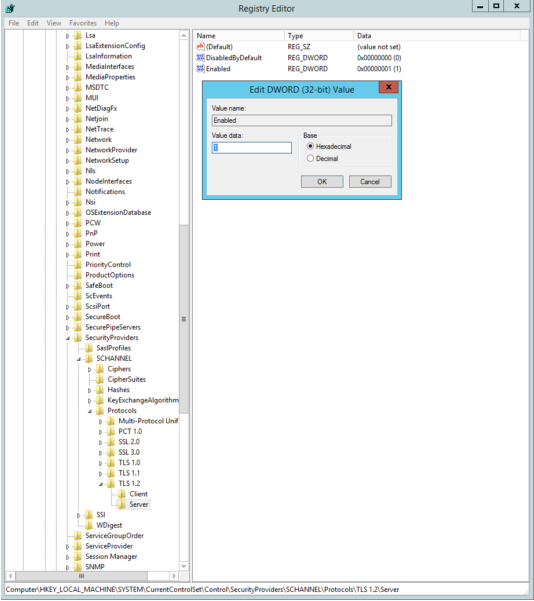
Browse to the following registry key: HKEY_LOCAL_MACHINE\SYSTEM\CurrentControlSet\Control\SecurityProviders\SCHANNEL\Protocols.
Right click on the Protocols folder and select New then Key from the drop-down menu. This will create new folder. Rename this folder to TLS 1.2.
Right click on the TLS 1.2 key and add two new keys underneath it.
Rename the two new keys as:
Client
Server
Right click on the Client key and select New and then DWORD (32-bit) Value from the drop-down list.
Rename the DWORD to DisabledByDefault.
Right-click the name DisabledByDefault and select Modify from the drop-down menu.
Ensure that the Valuedata field is set to 0 and the Base is Hexadecimal. Click on OK.
Create another DWORD for the Client key as you did in Step 6.
Rename this second DWORD to Enabled.
Right-click the name Enabled and select .. from the drop-down menu.
Ensure that the Valuedata field is set to 1 and the Base is Hexadecimal. Click on OK.
Repeat steps 6 to 13 for the Server key (by creating two DWORDs, DisabledByDefault and Enabled, and their values underneath the Server key).
Registry values that are added or changed to enable TLS 1.2
Configure .NET to use strong cryptography to the registry if needed. By configuring .NET to use strong cryptography this enables TLS 1.2 for .NET applications. Even if .NET 4.7 is installed it must be configured to enable TLS 1.2.
Start the registry editor by clicking on Start and Run. Type in “regedit” into the Run – Note: You will be editing the registry.
Browse to the following registry key: HKEY_LOCAL_MACHINE\SOFTWARE\Microsoft\.NETFramework\v4.0.30319
Right click on the 0.30319 key and select New and then DWORD (32-bit) Value from the drop-down list.
Rename the DWORD to SchUseStrongCrypto.
Right-click the name SchUseStrongCrypto and select Modify from the drop-down menu.
Ensure that the Valuedata field is set to 1 and the Base is Hexadecimal. Click on OK.
Browse to the following registry key: HKLM:\SOFTWARE\Wow6432Node\Microsoft\.NetFramework\v4.0.30319
Right click on the 4.0.30319 key and select New and then DWORD (32-bit) Value from the drop-down list.
Rename the DWORD to SchUseStrongCrypto.
Right-click the name SchUseStrongCrypto and select Modify from the drop-down menu.
Ensure that the Valuedata field is set to 1 and the Base is Hexadecimal. Click on OK.
Registry values that are added or changed to enable .NET to use strong crypto
Reboot the SQL Server: Once your SQL server has been rebooted, TLS 1.2 will be enabled.
Prerequisites to capture blocking chains is to install Brent Ozar’s First Responder Kit. The tool kit is an excellent resource for SQL troubleshooting.
The below mentioned process uses these scripts when checking out SQL Servers. Sometimes we can run them as needed and you can even have them running from an Agent job and logging to tables on a regular basis (Usually run them every 15 minutes but might run them more or less regularly as needed). It’s a great way to catch performance data over time if you don’t have any other monitoring tools, or even if you do, the data these procs catch can be a great supplement to those tools.
By far the most common cause for poor performance is blocking. Unless you’ve got some monitoring in place it’s near impossible to identify the cause of any historical blocking incidents. If you have scheduled SQL agent job and running the First responder kit regularly into tables, you will have a history of running statement thanks to sp_BlitzWho. That data will contain the SPIDs of any blocking processes.
Now, if you’ve ever had to look at that data and tried to figure out what the blocking chain is then you’ll know that it can be a total headache.
For that reason, we can use BlitzBlocking Chain (courtesy of David Fowler) to clearly show the lead blocker and how the chain is hanging together. By default, the proc expects the data to be in a table named BlitzWho.
Parameters – The proc takes two parameteres, @StartDate and @EndDate to specify the date range that you want to return. By default the proc will return any blocks recorded for the past hour.
CREATE OR ALTER PROC BlitzBlockingChain @StartDate AS DATETIME = NULL, @EndDate AS DATETIME = NULL
AS
BEGIN
IF @StartDate IS NULL SELECT @StartDate = DATEADD(MINUTE, -60, GETDATE());
IF @EndDate IS NULL SELECT @EndDate = DATEADD(MINUTE, 60, @StartDate);
AS ( SELECT CAST(‘Lead Blocker: ‘ + CAST(BlitzWho.session_id AS VARCHAR) AS VARCHAR(50)) AS Chain, BlitzWho.ID, BlitzWho.CheckDate, BlitzWho.session_id, BlitzWho.blocking_session_id, BlitzWho.login_name, BlitzWho.host_name, BlitzWho.program_name, BlitzWho.database_name, BlitzWho.elapsed_time, BlitzWho.query_text, BlitzWho.status, BlitzWho.wait_info FROM BlitzWho WHERE blocking_session_id IS NULL AND EXISTS (SELECT 1 FROM BlitzWho BW WHERE BlitzWho.CheckDate = BW.CheckDate AND BlitzWho.session_id = BW.blocking_session_id) AND CheckDate BETWEEN @StartDate AND @EndDate
UNION ALL
SELECT CAST(BlockChain.Chain + ‘ -> ‘ + CAST(BlitzWho.session_id AS VARCHAR) AS VARCHAR(50)) AS Chain, BlitzWho.ID, BlitzWho.CheckDate, BlitzWho.session_id, BlitzWho.blocking_session_id, BlitzWho.login_name, BlitzWho.host_name, BlitzWho.program_name, BlitzWho.database_name, BlitzWho.elapsed_time, BlitzWho.query_text, BlitzWho.status, BlitzWho.wait_info FROM BlitzWho INNER JOIN BlockChain ON BlitzWho.CheckDate = BlockChain.CheckDate AND BlitzWho.blocking_session_id = BlockChain.session_id )
SELECT * FROM BlockChain ORDER BY CheckDate, database_name, Chain
END
So what’s it look like if we run it, for the sake of this post we’ll just use the default parameters and return any blocks for the past hour.
EXEC BlitzBlockingChain
and the output:
The output shown easily spots the lead blocker and deal with it as you feel fit.