- Lets say that we created database on a single drive (both data and log file). Insert one Million records into the database table. Now query the table and it takes about 8 to 10 seconds to retrieve the data. It took about 2 seconds to insert the rows.
- Now, lets say that we create database with data and log files on separate drives. Do the same thing, insert rows and run a select query. What do you think happens now? Now, it took longer to insert the million rows. It took about 45 seconds to insert the rows. Why do you think this ran longer? Check the top waits, i see that the top waits are CXPACKET and ASYNC_NETWORK_IO. It shows that the data is being inserted in parallel and ASYNC_NETWORK_IO shows that your app is slow in retrieving the data. Now, when you look at the waits at the first scenario, top wait is WRITELOG. It had to waits for 10 seconds out of 12 sec execution time in order to complete the insert statement. In this scenario, the slowness was caused due to latency on the disk. In a real world scenario, you would have to investigate by talking to system admin or network admin to check if a particular disk is slow (measure the latency on the disk), or check if a network adapter is slow.
Category: sql server
Get status of SQL server services on one or more servers remotely
'SQLSERVER01','SQLSERVER02','SQLSERVER03'| get-dbaservice -Type Engine, Agent | Out-GridView
This will provide output as shown below:

The great thing about this approach is that, I can swap out the command get-dbaservice with restart-dbaservice. This will restart the SQL services remotely without having to RDP into a machine.
'SQLSERVER01','SQLSERVER02','SQLSERVER03'| Restart-dbaservice -Type Engine, Agent | Out-GridView
If you don’t have a monitoring tool, this is a great way to check if the services are running or not on a specific SQL server when you are troubleshooting a connection issue.
Update SQL service account on multiple SQL servers using dbatools
Typically, I use the following statement whenever i want to update a SQL service account
Get-DbaService sql1 -Type Engine -Instance MSSQLSERVER | Update-DbaServiceAccount -Username 'MyDomain\sqluser1'
Configures SQL Server engine service on the machine sql1 to run under MyDomain\sqluser1. Will request user to input the account password.
Here is a simple one liner to update SQL service account on multiple servers:
'SQLSERVER01','SQLSERVER02','SQLSERVER03'| Get-DbaService -Type Engine,Agent -Instance MSSQLSERVER | Update-DbaServiceAccount -Username 'MyDomain\sqluser1'
The type is inputs for both Engine and Agent. Therefore, both services will be set to run as that domain user.
Use Powershell to enable TLS 1.2 on a window server
 $path1 = 'HKLM:\SOFTWARE\Microsoft\.NETFramework\v2.0.50727'
 $path2 = 'HKLM:\SOFTWARE\Microsoft\.NETFramework\v4.0.30319'

#New-item -Path $path1 #Uncomment this line if you need to add the folder
 New-ItemProperty -Path $path1 -Name 'SystemDefaultTlsVersions' -Value 1 -PropertyType DWord
 New-ItemProperty -Path $path1 -Name 'SchUseStrongCrypto' -Value 1 -PropertyType DWord

#New-item -Path $path2 #Uncomment this line if you need to add the folder
 New-ItemProperty -Path $path2 -Name 'SystemDefaultTlsVersions' -Value 1 -PropertyType DWord
 New-ItemProperty -Path $path2 -Name 'SchUseStrongCrypto' -Value 1 -PropertyType DWord
Enforcing Strong Encryption: Enabling TLS 1.2 on SQL server
SQL Server 2019 RTM is shipped with TLS 1.2 support and no additional update/fix should be required to enable TLS 1.2 support. The server where SQL is installed must support TLS 1.2. Microsoft SQL 2019 /2016 is already enabled for TLS 1.2.
To ensure server can operate over TLS. Follow the below instructions to configure SQL server 2016.
- Enable TLS 1.2 to the registry if needed
- Start the registry editor by clicking on Start and Run. Type in “regedit” into the Run – Note: You will be editing the registry.
- Browse to the following registry key: HKEY_LOCAL_MACHINE\SYSTEM\CurrentControlSet\Control\SecurityProviders\SCHANNEL\Protocols.
- Right click on the Protocols folder and select New then Key from the drop-down menu. This will create new folder. Rename this folder to TLS 1.2.
- Right click on the TLS 1.2 key and add two new keys underneath it.
- Rename the two new keys as:
- Client
- Server
- Right click on the Client key and select New and then DWORD (32-bit) Value from the drop-down list.
- Rename the DWORD to DisabledByDefault.
- Right-click the name DisabledByDefault and select Modify from the drop-down menu.
- Ensure that the Value data field is set to 0 and the Base is Hexadecimal. Click on OK.
- Create another DWORD for the Client key as you did in Step 6.
- Rename this second DWORD to Enabled.
- Right-click the name Enabled and select .. from the drop-down menu.
- Ensure that the Value data field is set to 1 and the Base is Hexadecimal. Click on OK.
- Repeat steps 6 to 13 for the Server key (by creating two DWORDs, DisabledByDefault and Enabled, and their values underneath the Server key).
- Registry values that are added or changed to enable TLS 1.2
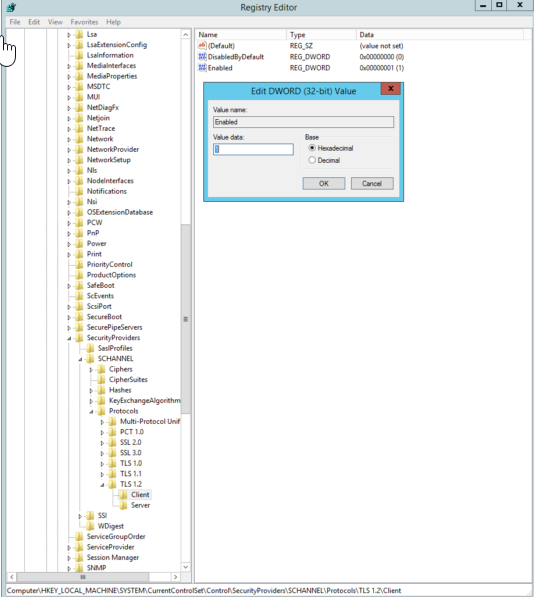
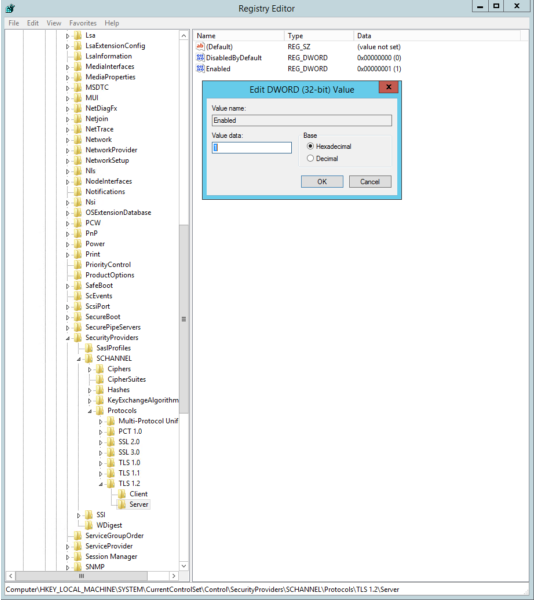
- Configure .NET to use strong cryptography to the registry if needed. By configuring .NET to use strong cryptography this enables TLS 1.2 for .NET applications. Even if .NET 4.7 is installed it must be configured to enable TLS 1.2.
- Start the registry editor by clicking on Start and Run. Type in “regedit” into the Run – Note: You will be editing the registry.
- Browse to the following registry key: HKEY_LOCAL_MACHINE\SOFTWARE\Microsoft\.NETFramework\v4.0.30319
- Right click on the 0.30319 key and select New and then DWORD (32-bit) Value from the drop-down list.
- Rename the DWORD to SchUseStrongCrypto.
- Right-click the name SchUseStrongCrypto and select Modify from the drop-down menu.
- Ensure that the Value data field is set to 1 and the Base is Hexadecimal. Click on OK.
- Browse to the following registry key: HKLM:\SOFTWARE\Wow6432Node\Microsoft\.NetFramework\v4.0.30319
- Right click on the 4.0.30319 key and select New and then DWORD (32-bit) Value from the drop-down list.
- Rename the DWORD to SchUseStrongCrypto.
- Right-click the name SchUseStrongCrypto and select Modify from the drop-down menu.
- Ensure that the Value data field is set to 1 and the Base is Hexadecimal. Click on OK.
- Registry values that are added or changed to enable .NET to use strong crypto


Reboot the SQL Server: Once your SQL server has been rebooted, TLS 1.2 will be enabled.

