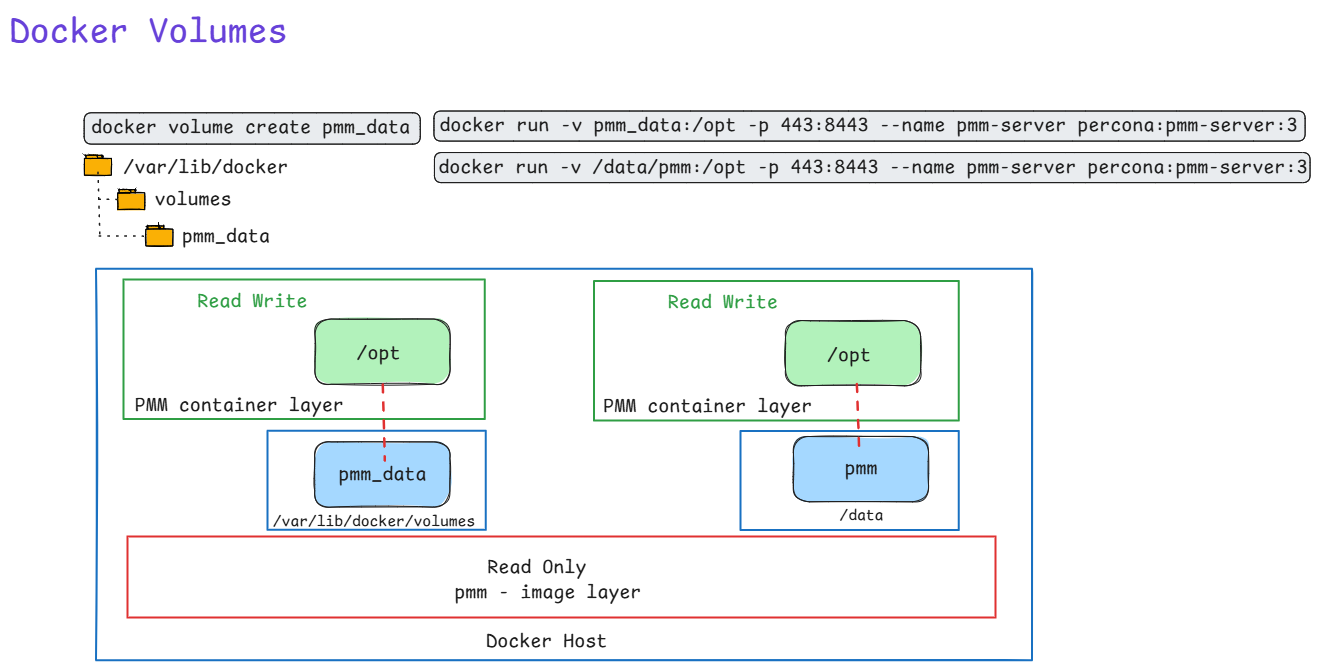
Here is an illustration of using docker volume to run PMM. Also shown is a constrast of using bind mount. Recommended method is to use docker volume with flag -v to persist data on the Host machine.
Here is an illustration of using docker volume to run PMM. Also shown is a constrast of using bind mount. Recommended method is to use docker volume with flag -v to persist data on the Host machine.
This can be done using the git reset command to move the HEAD pointer back one commit while keeping the changes in your working directory.
git reset HEAD~1
The command has successfully unstaged your last commit. The changes from that commit are now back in your working directory, but they are not staged or committed. You can now:
Revert the last local changes
This will discard all uncommitted changes in your working directory and staging area. Since this is a destructive operation, I’ll use git reset –hard to revert to the last commit.
git reset --hard HEAD
To mirror the folder structure of an entire drive to another drive using PowerShell, you can modify the script to iterate through all folders on the source drive. Here’s the updated script:
# Define source and destination drives
$sourceDrive = "E:"
$destinationDrive = "S:"

# Function to recursively mirror directory structure
function Mirror-DriveFolders {
    param (
        [string]$sourceDrive,
        [string]$destinationDrive
    )

    # Get all folders on the source drive
    $sourceFolders = Get-ChildItem -Path $sourceDrive -Directory -Recurse

    foreach ($folder in $sourceFolders) {
        # Construct the corresponding destination path
        $destinationPath = $folder.FullName.Replace($sourceDrive, $destinationDrive)

        # Create the directory in the destination if it doesn't exist
        if (!(Test-Path -Path $destinationPath)) {
            New-Item -ItemType Directory -Path $destinationPath -Force
        }
    }
}

# Mirror the directory structure of the entire drive
Mirror-DriveFolders -sourceDrive $sourceDrive -destinationDrive $destinationDrive

Write-Host "Folder structure of drive mirrored successfully."
Below is a shell script that creates a new user and adds their SSH public key to an Ubuntu VM:
#!/bin/bash

# Function to create a new user and add SSH public key
create_user_and_add_ssh_key() {
    username=$1
    ssh_key_path=$2

    # Create user
    sudo adduser --disabled-password --gecos "" $username

    # Create .ssh directory if not exists
    sudo -u $username mkdir -p /home/$username/.ssh

    # Copy SSH public key to authorized_keys file
    cat $ssh_key_path >> /home/$username/.ssh/authorized_keys

    # Set proper permissions
    sudo chown -R $username:$username /home/$username/.ssh
    sudo chmod 700 /home/$username/.ssh
    sudo chmod 600 /home/$username/.ssh/authorized_keys
}

# Example usage
new_username="newuser"
ssh_key_path="/path/to/public_key.pub"

create_user_and_add_ssh_key $new_username $ssh_key_path
Make sure to replace newuser with the desired username and /path/to/public_key.pub with the path to the SSH public key file you want to add.
Save this script to a file (e.g., create_user_and_add_ssh_key.sh), make it executable (chmod +x create_user_and_add_ssh_key.sh), and then run it (./create_user_and_add_ssh_key.sh).
This script will create a new user without a password prompt and add their SSH public key to the authorized_keys file.
This howto page will provide instructions on how to reach services running inside a firewall from outside of the network by using the Putty SSH Client and SSH Port Tunneling.
Download Putty.exe.
Launch Putty. Different categories will be listed on the left side, click on Connection > SSH > Tunnels.
Under Add new forwarded port:, enter the following information:
Source port: [port on local machine]
Destination: [hostname of remote machine]:[port on remote machine]
Click Add.
It would look like this if I wanted to forward port 80 on the CCIS webserver to 8080 on my local machine:
Clicking Add will add it to the list of forwarded ports:
After setting up the port tunnel, select Session from the category list on the left side.
Enter login.ccs.neu.edu in the Host Name (or IP Address) field and click the Open button at the bottom right.
Select Yes if prompted with this window:
Use your CCIS username and password when prompted to login and your port tunnel will be setup.
Now that the port is tunneled, you can connect to it using localhost:[port forwarded] where [port forwarded] is the local port you chose earlier.
In our previous example we forwarded port 80 on http://www.ccs.neu.edu to localhost:8080. We can now open up a web browser and browse to localhost:8080 to see it:
The steps are practically the same as tunneling any other service, except the port you will tunnel is 1433. When connecting from MSSQL Management Studio, the connection host will be 127.0.0.1,[port you forwarded] . Notice the comma between the ip and the port number, this is very important. The following screens will show the proper setup:
And there you have it, you should now be able to SSH Tunnel to any service inside a firewall.


