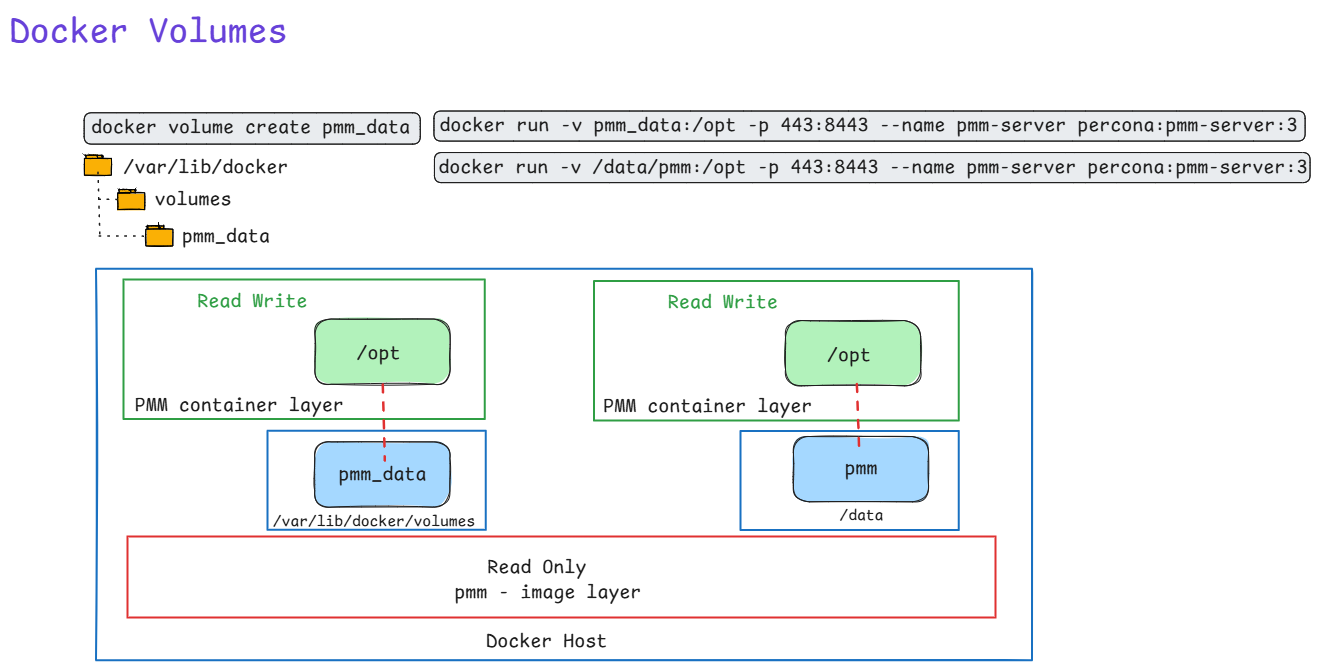
Here is an illustration of using docker volume to run PMM. Also shown is a constrast of using bind mount. Recommended method is to use docker volume with flag -v to persist data on the Host machine.
Here is an illustration of using docker volume to run PMM. Also shown is a constrast of using bind mount. Recommended method is to use docker volume with flag -v to persist data on the Host machine.
Ever
Ever been asked to pull a report of specific Azure VMs, their OS versions, who owns them, and exactly how much storage they are chewing up? Clicking through the Azure Portal to piece this together is a massive time sink.
This is where Azure Resource Graph (ARG) shines. I use the KQL query below whenever I need to quickly audit environments for cost allocation, cleanup projects, or basic inventory tracking.
Why this query is useful:
TotalCombinedStorageGB metric. It also safely handles edge cases, like VMs with zero data disks, without dropping them from the report.Owner tag and the OSVersion, allowing you to easily filter for specific teams or operating systems using fuzzy matches and lists.How to use it:
YOUR FILTERS section with your target OS and Owner names.
Resources
| where type =~ 'microsoft.compute/virtualmachines'
| extend VMName = tostring(name)
| extend Region = tostring(location)
| extend ResourceGroup = tostring(resourceGroup)
| extend OSType = tostring(properties.storageProfile.osDisk.osType)
| extend OSVersion = strcat(tostring(properties.storageProfile.imageReference.offer), " ", tostring(properties.storageProfile.imageReference.sku))
| extend Owner = tostring(tags['Owner'])
// --- YOUR FILTERS ---
| where OSVersion contains "<ENTER_OS_VERSION_HERE>"
// The in~ operator checks against a list of values
| where Owner in~ ("<OWNER_1>", "<OWNER_2>", "<OWNER_3>")
// --------------------
| extend OSDiskSizeGB = toint(properties.storageProfile.osDisk.diskSizeGB)
| extend OSDiskSizeGB = iff(isnull(OSDiskSizeGB), 0, OSDiskSizeGB)
| extend DataDisks = properties.storageProfile.dataDisks
| extend DataDisks = iff(isnull(DataDisks) or array_length(DataDisks) == 0, dynamic([{"diskSizeGB": 0}]), DataDisks)
| mv-expand DataDisks
| extend DataDiskSizeGB = toint(DataDisks.diskSizeGB)
| extend DataDiskSizeGB = iff(isnull(DataDiskSizeGB), 0, DataDiskSizeGB)
| summarize TotalDataDiskSizeGB = sum(DataDiskSizeGB) by id, VMName, ResourceGroup, subscriptionId, Region, OSType, OSVersion, Owner, OSDiskSizeGB
| extend TotalCombinedStorageGB = OSDiskSizeGB + TotalDataDiskSizeGB
| join kind=leftouter (
    ResourceContainers
    | where type =~ 'microsoft.resources/subscriptions'
    | project subscriptionId, SubscriptionName = tostring(name)
) on subscriptionId
| project
    VMName,
    ResourceGroup,
    SubscriptionName,
    Region,
    OSType,
    OSVersion,
    Owner,
    OSDiskSizeGB,
    TotalDataDiskSizeGB,
    TotalCombinedStorageGB
| order by VMName asc
Inactive replication slots in Azure Database for PostgreSQL Flexible Server can silently fill your disk with WAL files. Here’s how to spot, drop, and prevent them.
Replication slots ensure WAL retention so consumers (CDC tools, read replicas) don’t miss changes. Inactive slots—created by stopped CDC jobs, deleted replicas, or failed experiments—pin old WAL indefinitely, consuming storage until it fills. Azure Flexible Server has safeguards like auto-grow, but slots can still cause outages.
Run these to identify storage hogs:
-- WAL retained by each slot (biggest first)
SELECT slot_name, plugin, slot_type, active,
       pg_size_pretty(pg_wal_lsn_diff(restart_lsn, '0/0')) AS retained_wal
FROM pg_replication_slots
ORDER BY pg_wal_lsn_diff(restart_lsn, '0/0') DESC;
-- Current lag relative to WAL head
SELECT slot_name,
       pg_size_pretty(pg_wal_lsn_diff(pg_current_wal_lsn(), restart_lsn)) AS lag_size
FROM pg_replication_slots;
-- Inactive slots only
SELECT * FROM pg_replication_slots WHERE NOT active;
-- Check active physical replication (HA/replicas)
SELECT pid, state, sent_lsn, replay_lsn, write_lag
FROM pg_stat_replication;
Focus on inactive logical slots (slot_type='logical', active=false).
Drop one by one—never active or Azure HA slots like azure_standby:
SELECT pg_drop_replication_slot('your_inactive_slot_name');
Storage recovers as WAL checkpoints recycle old segments (minutes to hours). Verify with Azure Metrics > Disk Used.
As a SQL Server DBA, one of the most repetitive administrative tasks is granting user access to multiple databases — especially in environments with dozens or even hundreds of databases.
Instead of manually connecting to each database and assigning roles, you can automate the process with the dbatools PowerShell module.
In this post, we’ll walk through how to automatically grant a user db_datareader and db_datawriter roles across all user databases, while excluding system databases.
Before running the script:
Install-Module dbatools -Scope CurrentUser -Force
# Requires dbatools
# Install-Module dbatools -Scope CurrentUser -Force

$SqlInstance = "MyServer\MyInstance"  # Replace with your SQL Server instance
$Login = "MyDomain\MyUser"            # Replace with your Windows or SQL login

# Get all user databases (excluding system DBs)
$UserDatabases = Get-DbaDatabase -SqlInstance $SqlInstance | Where-Object { -not $_.IsSystemObject }

foreach ($db in $UserDatabases) {
    Write-Host "Processing database: $($db.Name)" -ForegroundColor Cyan

    try {
        # Create the user if not already present
        $user = Get-DbaDbUser -SqlInstance $SqlInstance -Database $db.Name -User $Login -ErrorAction SilentlyContinue
        if (-not $user) {
            New-DbaDbUser -SqlInstance $SqlInstance -Database $db.Name -Login $Login -Username $Login -Confirm:$false | Out-Null
        }

        # Grant roles
        Add-DbaDbRoleMember -SqlInstance $SqlInstance -Database $db.Name -Role db_datareader -User $Login -Confirm:$false -ErrorAction Stop
        Add-DbaDbRoleMember -SqlInstance $SqlInstance -Database $db.Name -Role db_datawriter -User $Login -Confirm:$false -ErrorAction Stop

        Write-Host "✅ Granted db_datareader and db_datawriter in $($db.Name)" -ForegroundColor Green
    }
    catch {
        Write-Warning "Failed to process $($db.Name): $_"
    }
}

Write-Host "Completed assigning roles for $Login on all user databases." -ForegroundColor Green
-Confirm:$false), making it perfect for automation or CI/CD pipelines.
.\Grant-DbRoles.ps1 -SqlInstance "SQL01" -Login "Contoso\User123"
Break down in plain language, building from basics to the complete picture.
Think of Azure Private Link Service like a private, secure doorway between two buildings:
Azure Private Link Service creates a private tunnel through the ground (Azure’s backbone network) that only connects these two specific buildings, and nobody else can use it.
Imagine you have a service (like your MySQL database) running in your private Azure network. Normally, there are only two ways for external services to reach it:
Azure Private Link Service provides a third way:
It’s like having a private phone line installed between two companies:
Scenario A: Third-Party SaaS Needs Private Access
Scenario B: Customer Access to Your Services
Scenario C: Cross-Region Private Access
You’re using it because:
Let me walk through this step-by-step with your Snowflake scenario:
In your Azure subscription:
Your Actions:
├─ Create Standard Load Balancer
│  └─ Backend pool: ProxySQL VMs
├─ Create Private Link Service
│  ├─ Attach to Load Balancer's frontend IP
│  ├─ Generate a unique "alias" (like a secret address)
│  └─ Set visibility controls
What happens:
mycompany-mysql-pls.abc123.azure.privatelinkserviceYou give Snowflake two things:
Important: The alias itself doesn’t grant access – it’s just the address. Think of it like knowing someone’s phone number doesn’t mean they’ll accept your call.
In Snowflake’s Azure environment (which you don’t control):
Snowflake's Actions:
├─ Create Private Endpoint in their VNet
│  └─ Target: Your Private Link Service alias
├─ This generates a connection request
└─ Connection shows as "Pending" (waiting for your approval)
What happens:
In your Azure portal:
You see:
├─ Connection Request from Snowflake
│  ├─ Shows their subscription ID
│  ├─ Shows requested resource (your Private Link Service)
│  └─ Status: "Pending"
└─ You click: "Approve"
What happens:
Now the complete path exists:
Snowflake OpenFlow
    ↓
Connects to: 10.x.x.x (private IP in Snowflake's VNet)
    ↓
[AZURE BACKBONE - ENCRYPTED TUNNEL]
    ↓
Arrives at: Your Load Balancer (in your VNet)
    ↓
Routes to: ProxySQL → MySQL
Physical Level:
Analogy: It’s like sending a letter inside a locked box, which is then placed inside another locked box, with special routing instructions that only the Azure network fabric can read.
Key Point: Neither end has a public IP address
Snowflake side:
├─ Private Endpoint: 10.0.5.20 (private IP)
└─ NOT exposed to internet

Your side:
├─ Load Balancer: 10.1.2.10 (private frontend IP)
└─ NOT exposed to internet
Why this matters:
The path traffic takes:
The security here:
Even though it’s on a private network, data is still encrypted:
Application Layer (MySQL):
└─ TLS/SSL encryption (MySQL protocol with SSL)
   └─ Your ProxySQL and MySQL enforce encrypted connections

Transport Layer:
└─ Private Link provides network-level isolation
   └─ Even if someone accessed the physical network, data is encrypted
Let me give you a comprehensive security checklist:
Setting: Auto-approval vs Manual approval
Your choice: MANUAL APPROVAL ✓

Why:
- You explicitly approve each connection request
- See who's requesting (subscription ID, service name)
- Can reject suspicious requests
- Can revoke access anytime
Action Item: Always use manual approval for production PHI data.
Options:
├─ Role-Based (Subscription): Only specific subscriptions can see your service
├─ Role-Based (Explicit list): You list exact subscription IDs
└─ Public: Anyone can request (you still approve)

Your choice: Role-Based with Snowflake's subscription ID ✓

Why:
- Limits who can even discover your Private Link Service
- Reduces surface area for connection attempts
Action Item: Configure visibility to allow ONLY Snowflake’s Azure subscription ID.
Monitor:
├─ Active connections (who's connected right now)
├─ Pending requests (who's trying to connect)
├─ Rejected connections (what you've denied)
└─ Connection history (audit trail)
Action Item: Set up Azure Monitor alerts for:
On your Load Balancer subnet:
Inbound Rules:
├─ ALLOW: From Private Link Service (Azure service tag)
│  └─ Port: 3306 (MySQL)
├─ DENY: Everything else
└─ Priority: Specific to general

Why:
- Even though traffic comes via Private Link, add NSG layer
- Defense in depth principle
- Logs any unexpected traffic patterns
Load Balancer Configuration:
├─ Frontend: INTERNAL only (not public)
├─ Backend pool: Only specific ProxySQL VMs
├─ Health probes: Ensure only healthy backends receive traffic
└─ Session persistence: Configure based on OpenFlow needs
Action Item: Use Internal Load Balancer (not public-facing).
ProxySQL VM:
├─ No public IP address ✓
├─ NSG allows ONLY from Load Balancer subnet ✓
├─ OS firewall (firewalld/iptables) allows only port 3306 ✓
├─ Managed identity for authentication (no passwords) ✓
└─ Regular security patching ✓
On MySQL Flexible Server:
-- Require SSL connections
REQUIRE SSL;

-- Verify setting
SHOW VARIABLES LIKE 'require_secure_transport';
-- Should return: ON
On ProxySQL:
-- Configure SSL for backend connections
UPDATE mysql_servers
SET use_ssl=1
WHERE hostgroup_id=0;

-- Force SSL for users
UPDATE mysql_users
SET use_ssl=1;
Action Item: Never allow unencrypted MySQL connections, even over Private Link.
MySQL SSL Configuration:
├─ Use Azure-managed certificates
├─ Enable certificate validation
├─ Rotate certificates regularly
└─ Monitor certificate expiration

ProxySQL Configuration:
├─ Validate MySQL server certificates
├─ Use proper CA bundle
└─ Log SSL handshake failures
Create a dedicated user for Snowflake OpenFlow:
-- Create dedicated user
CREATE USER 'snowflake_cdc'@'%'
IDENTIFIED WITH mysql_native_password BY 'strong_password'
REQUIRE SSL;

-- Grant ONLY necessary permissions
GRANT SELECT, REPLICATION SLAVE, REPLICATION CLIENT
ON your_database.*
TO 'snowflake_cdc'@'%';

-- Restrict to specific tables if possible
GRANT SELECT
ON your_database.specific_table
TO 'snowflake_cdc'@'%';
Key Principle: Least privilege – only grant what OpenFlow needs for CDC.
-- ProxySQL can add another auth layer
-- Different credentials externally vs internally

INSERT INTO mysql_users (
  username,
  password,
  default_hostgroup,
  max_connections
) VALUES (
  'snowflake_cdc',
  'external_password',
  0,  -- backend hostgroup
  100 -- connection limit
);
Benefit: You can change backend MySQL credentials without updating Snowflake.
Enable diagnostics on:
├─ Private Link Service
│  └─ Log: Connection requests, approvals, data transfer
├─ Load Balancer
│  └─ Metrics: Connection count, bytes transferred, health status
├─ Network Security Groups
│  └─ Flow logs: All traffic patterns
└─ ProxySQL VM
   └─ Azure Monitor Agent: OS and application logs
-- Enable audit log
SET GLOBAL audit_log_policy = 'ALL';

-- Monitor for:
├─ Failed authentication attempts
├─ Unusual query patterns
├─ Large data exports
└─ Access outside business hours
Set up alerts for:
├─ New Private Link connection requests
├─ High data transfer volumes (possible data exfiltration)
├─ Failed authentication attempts
├─ ProxySQL health check failures
├─ Load Balancer backend unhealthy
└─ NSG rule matches (blocked traffic attempts)
Ensure:
├─ Private Link Service: Same region as MySQL
├─ Load Balancer: Same region
├─ ProxySQL VMs: Same region
└─ Snowflake region: Appropriate for your PHI requirements

Why: Minimize data travel, maintain compliance boundaries
MySQL Flexible Server:
├─ Enable: Customer-managed keys (CMK) with Azure Key Vault
├─ Rotate: Keys regularly
└─ Audit: Key access logs

Why: PHI must be encrypted at rest
Retention policy:
├─ Connection logs: 90 days minimum
├─ Query audit logs: Per HIPAA requirements
├─ NSG flow logs: 30 days minimum
└─ Azure Activity logs: 90 days minimum

Why: Compliance audits, incident investigation
Before going live, verify:
☐ Private Link Service visibility: Restricted to Snowflake subscription
☐ Manual approval: Enabled (no auto-approval)
☐ NSG rules: Properly configured on all subnets
☐ Load Balancer: Internal only (no public IP)
☐ ProxySQL VMs: No public IPs, managed identities configured
☐ MySQL SSL: Required for all connections
☐ Certificate validation: Enabled
☐ Least privilege: MySQL user has minimal permissions
☐ Audit logging: Enabled on MySQL and ProxySQL
☐ Azure Monitor: Diagnostic logs enabled on all components
☐ Alerts: Configured for security events
☐ Network flow logs: Enabled for NSGs
☐ Encryption at rest: Customer-managed keys configured
☐ Backup encryption: Verified
☐ Disaster recovery: Tested with Private Link maintained
☐ Documentation: Architecture diagram, runbooks created
☐ Incident response: Plan includes Private Link scenarios
☐ Weekly: Review connection logs
☐ Weekly: Check for pending connection requests
☐ Monthly: Audit MySQL user permissions
☐ Monthly: Review NSG rules for drift
☐ Quarterly: Certificate expiration check
☐ Quarterly: Penetration testing (authorized)
☐ Annually: Full security audit
☐ Continuous: Monitor alerts in real-time
A: No, for multiple reasons:
A: Multiple verification layers:
A: Defense in depth protects you:
A: Yes, for several reasons:
Azure Private Link Service creates a multi-layered secure connection:
Security Layers (from outer to inner):
│
├─ Layer 1: Access Control
│   └─ Manual approval, subscription restrictions
│
├─ Layer 2: Network Isolation
│   └─ Private IPs, no internet exposure, Azure backbone
│
├─ Layer 3: Traffic Control
│   └─ NSGs, Load Balancer rules, firewall policies
│
├─ Layer 4: Encryption in Transit
│   └─ TLS/SSL for MySQL protocol
│
├─ Layer 5: Authentication
│   └─ MySQL user credentials, certificate validation
│
├─ Layer 6: Authorization
│   └─ Least privilege MySQL permissions
│
├─ Layer 7: Monitoring & Auditing
│   └─ Logs, alerts, anomaly detection
│
└─ Layer 8: Encryption at Rest
    └─ Customer-managed keys for MySQL data
Each layer provides protection, so even if one layer is compromised, others maintain security.
